Tuesday, October 25, 2011

Techniques on Tuesdays: "All I want..."

In this case, all I want is for a technique to go right!

So typically on Tuesdays I try to share helpful little tips and techniques for enhancing your scrapbooking endeavors. What I don't usually share is the epic fail moments that come along in the process of developing these techniques. So in the spirit of "everything that can go wrong, did go wrong" I thought I'd share a little behind the scenes info on the making of this particular layout.

First up, the list numbers.

These look pretty simple right? A little grungeboard + a little ink. Surely an easy way to add numbers to your layout, right? Wrong! I didn't want to "mess" with painting the grungeboard, so I thought I'd color them with pigment ink instead. Well... that definately didn't go as planned. The ink wouldn't dry! And of course I had already adhered the numbers to the layout. In an attempt to get the ink to set, I tried: (1) Setting the ink with a heat gun, (2) blotting the "wet" ink off with a paper towel, and (3) letting it dry overnight. How did I finally end up compensating for this problem? I added Glossy Accents to seal it in. I don't care for the glossy, 3-D look as well as the original ink, but hey, at least it won't leave ink all over everything anymore!

Lesson learned: Colobox metallic pigment inks never dry when applied to Grungeboard.

Second, inky fingerprints

My other problem was that the wet ink got on my fingers and then I accidently left finger prints on the paper! Totally another "ut oh!" moment.

Saving your layout solution: Use a paper towel to rub the ink and blend it into the background papers. i actually ended up "finger painting" on my layout to work additional ink splotches into the layout so it would look intentional. It's a good thing that Basic Grey papers are grungy!

So anyway, if you find a few mishaps occur as you work along, there are always ways to still salvage the layout!

Leave a comment and share what layout mishaps have you encountered and how you "saved" the layout.

Thursday, October 20, 2011

Techniques on Tuesday...er Thursday.

I'm not a huge fan of things that are cutesy so I tend not to use my Cricut for making embellishments. Instead I often make background elements like the artisan label shown in the layout below.

Look for this project in the Cricut Holiday Ideas Book.
This project will return in November 2012.


DSCN3708_ed_cr_blog.jpg
Layout created for The Scrapbooking Studio Design Team.

Cutting instructions for the Cricut page elements
"25"
  • Storybook cartridge
  • 1.75"
  • No additional settings for the shapes
  • Cutting settings for Grungeboard: Pressure - High; Speed - High; Blade - 6; Multicut - On
Green label shadow
  • Elegant Edges cartridge
  • Shadow = on
  • Shape =  swirl1
  • Cut size = 10.25"
Green patterned paper label
  • Elegant Edges cartridge
  • Shift + Shape = Swirl1-s
  • Cut size = 10.25"

Tuesday, October 18, 2011

Merry Christmas Layout with new Basic Grey

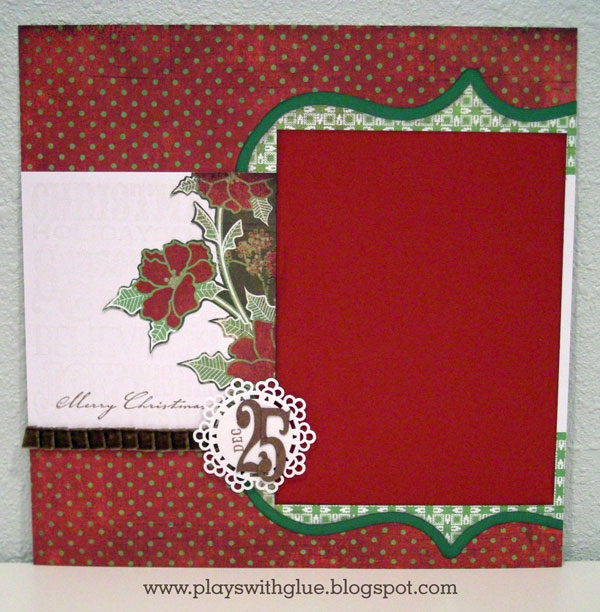
I've never been much of a fan of Halloween. I think I stopped trick or treating after the 5th grade actually. So today I'm skipping straight to Christmas to share with you a layout for The Scrapbooking Studio featuring Basic Grey's new Christmas line, "Nordic Holiday."

I like Basic Grey designs and often buy it, but I have to confess I really struggle to "make it work." Partly because the papers themselves are so interesting that I always want to do fussy layouts with lots of details and embellishements. Unfortunately, I always feel like that detracts from the focal points (the photos) and I've kind of come to decide that with Basic Grey, less is often more.

Supplies: Patterned Paper - Basic Grey; Cardstock - Bazzill (red is Barkley); Die cut - Martha Stewart; Stamps - Unity, Stampin' Up, Tim Holtz/Stampendous; Ribbon - Making Memories from their "Noel" line; Pen - Sakura in Stardust; Inks - Versafine Vintage Sepia, Versa Color Vanilla, VersaMark Dazzle, Colorbox chalk in Charcoal; Numbers - cut from Grungeboard using the Storybook Cricut Cartridge.

I thought a plain white strip of paper through the middle seemed a little too boring. I was hoping to give it some visual interest and a little sheen while still keeping an open feeling about it. I used the new Christmas stamps from Tim Holtz to create this background. First, I inked the stamp with the VersaColor Vanilla and then I inked over that with the VersaMark Dazzlein Champagne. Overall, I like how it came out, but think it maybe needs to be just a tinge darker. How well you can see it really depends greatly on the angle of the light.

Click to bigify.

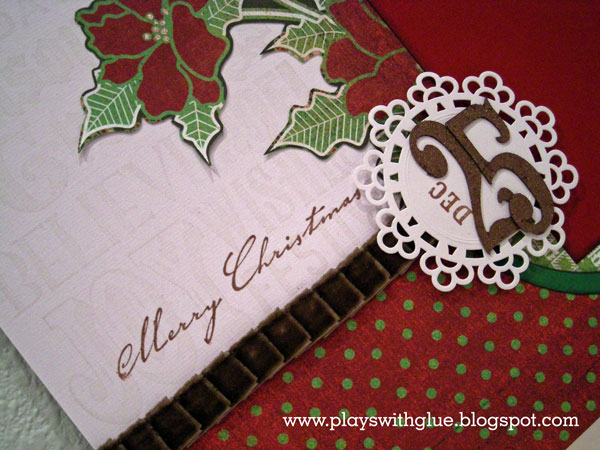
And of course, what is Christmas without a little sparkle, right? In addtion to the shimmer from the VersaMark ink, I also used a Stardust gelly roller pen (made by Sakura) to add a little more glam to the page by highlighting the little berries in the pointsettias. Having never been one to resist some shine, I added sparkle to the "25" numbers with some Tattered Angels Glimmer Mist (in Tattered Leather).

And there you have it, a simply elegant layout ready to accomodate two 4"x6" photos, a 5.75"x8" photo collage, or a 5"x7" photo.

Techiniques on Tuesdays is moving to Thursday this week. Check back for instructions on how to make the artisan label background using the Cricut.

Monday, October 17, 2011

40 hours of scrapbooking time...


Don't forget, this is the last week to sign up for the No Frills Scrapbooking Retreat in Coralville, Iowa. You'll enjoy 40 hours of scrapbooking and a minimum of 6 feet of table space all to yourself!

Learn more here: http://playswithglue.blogspot.com/p/no-frills-scrapbooking-retreats.html

Or, register here: http://www.eventbrite.com/event/1758617071/blog

Tuesday, October 11, 2011

Tutorials on Tuesdays: Corkboard background

First, let me apologize for the image quality in the post. Let's just say my creative juices tend flow at night, very late at night. You know, when the sun hasn't been shining for hours, and won't be shining again for several more hours. But despite the lack of light, I wanted to share this fun idea to make your own "pinboard" for your pages.


Lifestyle Crafts (Quickutz) sells a pack of self-adhesive cork for use with their dies. The pack comes with two different types of cork - a tight, smooth sheet and then one that looks like this and has larger, chippy pieces of cork.

For this background, you'll need two sheets and you'll want to cut them down 6" wide by 4" tall.
Then stack the two pieces on top of each other.


Once you've created the corkboard, you'll want to cut strips to create the "moulding" around it. In this case, I used some old school Making Memories metal moulding strips that I painted. You could cut chipboard and emboss it with one of the Lifestyle Crafts border embossing folders instead.

Once your moulding strips are ready, cut the corners at an angle to match up picture frame style and glue them down around the edges.

Voila! Instant corkboard!

Try it on a page and leave a comment with a link to your creation.

...Oh, and if you need some fun "pins" for your pinboard, Recollections makes a set of chrome colored flat pearls that work wonderfully!

Monday, October 10, 2011

Going to the retreat? The hotel discount ends soon!

If you're planning to go to the No Frills Scrapbooking Retreat and you haven't reserved your room yet, hurry! The room discount ends on Oct. 14!


Hotel Accommodations
  • Rate per Room: $ 84.00, plus tax per night (by separate reservation)
  • Room Type: Standard Room with 2 Queen beds (up to 4 person occupancy)
  • Arrival/Depart: 10/28/11-10/30/11
  • Payment Arrangements: Hotel room & tax charges are separate from the retreat registration fee and must be paid for separately.
  • Call 319-545-8464, ask for the “No Frills Scrapbook Retreat” block
  • On-line reservations can be made at www.countryinns.com/coralvilleia using the Promotional Code: SCRAP

Room type availability is on a first come/first served basis. Individual room cancellations will be accepted up to 6pm day of arrival. The rooms reserved for the retreat will only be held through Oct. 14, 2011. After that date room availability will depend upon general hotel availability.

Hotel is conveniently located near: Coralridge Mall, Memories on Fifth, Hobby Lobby, and Michaels as well as several restaurants.


Friday, October 7, 2011

Holiday Planner - New Teresa Collins "Christmas Home" Line

Okay, so I know it's not even Halloween yet, but I have to confess. All of this cooler weather last week has me dreaming of snow and thinking of Christmas already!

Click to Bigify.

To make matters worse I happened upon this site the other day: http://christmas.organizedhome.com/

Be still my heart! It's a sited filled with Christmas AND Organization! (I will totally be hot gluing punch cups to sheets of cardboard to store my ornaments in soon.) But then I started thinking. Every year I do keep my own holiday planner of sorts. It's nothing fancy. Just a notebook with gift and to do lists. So I thought hey, I've got time. Why not make a pretty holiday planner? So with that idea and a little inspiration from the Organized Home web site, I set out to design my own planner using the new Teresa Collins "Christmas Home" line that I got from The Scrapbooking Studio. (Even if you don't live near by, they'll ship you supplies. Just give them a call. That's what I do. *wink*).

Now keep in mind, I only decorated the cover. I left the divider pages flat so that you could write on the planner pages without contending with a lumpy and bumpy surface underneath.

If you have Cricut Design Studio, here's my cut file for the tabbed divider pages. (Must have the Fabulous Finds cartridge for it to work.)
Click to Bigify.

 Supplies from The Scrapbooking Studio: Teresa Collins "Christmas Home" patterned papers, decorative brads, and Covers. Theresa Collins Zach's book plates. Kraft snowflakes, kraft journaling spot, acrylic letters, star stick pins, and ledger transparency all from Maya Road. Black and green paint - Ranger. Black cardstock - Bazzill


Want to see this project in person? Head on over to The Scrapbooking Studio!

Tuesday, October 4, 2011

Tutorials on Tuesdays: Top secret information...

Today I'm going to let you in on a little secret about my scrapbooking process. Yes, a S-E-C-E-R-E-T. So pull your chair in , move a little closer to your monitor, and get ready for my big reveal.

Are you ready? Here it comes...

I don't start my page design process with photos.

Whaaa??? You say?

That's right. I don't start with photos. (Okay, so that's only like half true -I do have a contact sheet at hand.)

Let me explain.

I find that when I start with the photos I focus too much on trying to figure out how to fit them on the page. This one here, this one there. Too many to fit, too large to fit. The puzzle just doesn't come together.

Then one day I had an ephinany: You can always resize photos and you can always make more pages. What you can't do (well, at least not easily) is resize embellishments or make the page itself bigger (12x12 is it).

So rather than fight with the page elements, I find it easier to build the page and then edit my photos to fit. Sometimes it's editing them for scale (size), sometimes for color, sometimes for style (vintage effects), and sometimes for emphasis (have you checked out the lomo effect in Photoshop Elements? It rocks!).

Freeing myself from the "photos first" mindset has helped me use my supplies to build a backdrop that highlights my photos instead of fighting with them. Try it next time you make a layout and leave a comment. I'd love to hear if it works for you too.

Monday, October 3, 2011

Crate Paper "Farmhouse" i pick u

Today is my sister's birthday, so I thought it only fitting to make today's post a layout that I made for her. We have quite the deal going.... She does fun things, takes pictures and sends them to me. I in-turn scrapbook for her and she gets to keep the layout. (Oh, and um... this one counts as your birthday present too, right?)

Anyway up for your viewing pleasure is a this two page layout using the all new Farmhouse from Crate Paper. Crate Paper has long been a favorite of mine. I love the weight and texture of their paper and just can't resist their chipboard shapes!

Isn't this little berry basket just adorable? It was really simple to make by cutting up a piece of corrugated paper and gluing on a stack of buttons as berries.

The chipboard apples and the word "sweet" are just perfect for the theme of this layout. And of course the doily punch by Martha Stewart is always one of my "go to" tools.


And here's the whole spread!
Click the image to bigify.

Thanks for stopping by today. As always, you can stop by The Scrapbooking Studio to see it in person and "pick" some supplies for yourself :)

xx

Saturday, October 1, 2011

Neglecting the blog while I'm busy "Reaching for the stars"...

Hello blog followers! First let me just apologize for being a little sparse on the blog lately. I've been so busy designing for things with deadlines, balancing a demanding professional life, and helping with some family things in my personal life that I just haven't had time to get all of the blog content pulled together and posted. The good news is that I have lots of things in the works to share with you soon! :)

Today I'm doing a little project catch-up and thought I'd share with you a layout I did for a Club CK  "Two-hour challenge: Independence Challenge from Scrapbooking from the Inside Out" last month. I tend to be an event scrapbooker so I like to do these every once in awhile because it gets me to scrapbook the everyday and snapshots of "me." This particular challenge was about "money" and I chose to scrapbook about my own inner struggle between my desire for financial security (offered by my current job) and wanting to pursue my dream of working in the scrapbooking industry (the financial insecurity of getting started in a new profession).

Hence the following layout was born using October Afternoon's Space Age line.
 Click to bigify.
Supplies: October Afternoon, Heidi Swapp, EK Success, American Crafts, Making Memories, Tim Holtz


Speaking of top secret things... I've got some big news (for me anyway) in the works, but I can't share it just yet. Man, the suspense is killing me! Guess you'll just have to stay tuned! In the mean time, I'll share the "top secret" hidden journaling with you.