Thursday, January 12, 2012

30 min layout

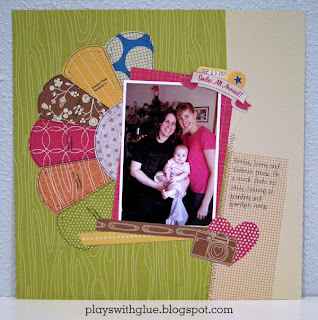
Today I am bringing you a layout the can be created in 30 mins (or less if you are super speedy) that I created for The Scrapbooking Studio design team.

Supplies: Paper and Stickers - American Crafts; Dresden plate pattern - McCall's (resized in CorelDraw); Printer - Epson; Pen - Copic; Adhesive - Kokuyo.

 
Here's how:
  1. Start up your computer and while it's booting connect your printer and gather your supplies.
  2. Cut 4" wide by 6" pieces from 7 different pattern papers (these are going to be the dresden plate quilt pieces).
  3. Open the dresden plate print file and print 6 of the 'petal' pieces and then 1 of the center circle pieces. (Don't forget to set your page size to 4" wide by 6" high.)
  4. While the pieces are printing, use a craft knife to cut along the upper left corner of the camera and then along part of the edge of the heart. Cut just enough to tuck in the photo mat and picture plus a few strips of paper.
  5. By now the pieces should be done printing. Open your photo and print it at 4" wide x 6" high with a white border.
  6. While your photo is printing, trim out the dresden plate pieces. You can speed up this process by cutting the straight sides with your trimmer and then fussy cut the curved edges with scissors.
  7. Using a date stamp, add the date to an index tab sticker. Set aside to let the ink dry. (I used Versafine Sepia on an October Afternoon Cherry Hill collection sticker.)
  8. Your photo should be done printing and had a little extra dry time while you were completing items 6 and 7. Grab it off the printer, lay it over the paper you want to use and use your trimmer to cut the photo mat about a half inch larger than the photo on two sides. (Remember, dont measure it out. Just eyeball it so you can finish in under 30 minutes!
  9. Put adhesive on about half of the photo mat and slide the lower right corner into the slit that was cut around the camera and heart. Let it sit lightly tacked. DON'T FIRMLY ADHERE IT YET.
  10. Put a little adhesive on the back of each of your dresden plate pieces. Arange them by sliding the pieces under the photo mat and put the circle on top of the pieces.
  11. Add photo corner to upper right corner of photo mat, add photo, then add star and banner stickers.
  12. Cut paper strips to length and add to the bottom of the photo, making sure to tuck the right ends under the slit.
  13. When you are happy with the arrangement, then press all of the pieces down so they are firmly in place.

There you go! A quick and easy layout. Done and done. :)
Tuesday, January 10, 2012

Techniques on Tuesdays: Working with Vintage Photos

A couple of years back my grandma found some old negatives in her collection of family photos. I created a way to scan them and we now have digital prints of these priceless photos. Yay! But, even though they are digital, they are still limited prints of heritage photos that need to be properly preserved.

One of the things I find challenging about heritage photos is how to scrap them in an artistic way, without damaging the photos. Afterall, one of the main reasons to scrapbook is to preserve memories in an archivally sound way. For example, in the layout below, I wanted to layer elements over the photos as well as below them.

Supplies: Patterned Papers, Stickers, Journaling Card - Simple Stories; Photo Corners - Recollections; Twine - Unknown; Pen - Sakura; Journaling Spot - Maya Road

So to protect the vintage photos I used a few tricks. First, I used photo corners to hold the photos on the page.

Then, I cut clear acetate to the same size as the photos and slipped them over the top of the photos and into the photo corners in order to protect the photos. That way, I could still layer the ticket stickers over the bottom of the photos to achieve the layout I wanted, while still preserving the integrity of the photos.

If you'd like to use this technique on your next layout, here's what I use:


I also incorporated a shopping bag from The Scrapbooking Studio. Even though the bag wasn't acid free, I used Archival Mist to make it safe for use with photos.

Wednesday, January 4, 2012

Cards on Wednesdays

Well, how perfect is this? It's time for cards on Wednesdays and today I have a birthday card to share with you AND it's my birthday (and my boss' birthday). Who knew the scrappy fates would align so perfectly today!?

So I leave you with this Birthday card that I designed for The Scrapbooking Studio Design Team while I head off in search of a piece of cake :)

Supplies: Patterned Papers, Canvas Stickers, Pen - American Crafts; Felt Flower - Basic Grey; Stamp - Studio G; Cardstock - Bazzill; Ink - Versafine; Adhesive - Kokuyo

Tuesday, January 3, 2012

Techniques on Tuesdays: Snow Card with "Faux Blizzard" Paint Technique

Ah, it's Tuesday again, and you know what that means... it's time for another technique!

As much I'd love for you all to think that my scrapbooking room is perfectly styled and that all of my projects just magically appear in simple perfection, made with my flawlessly manicured hands.... I have to break it to you, my endeavors are really far more "test kitchen" than a seamless craft segment ready for its prime time spotlight on The Martha Stewart Show. I know, I know... you're all just shocked by today's revelation.

...

...Aren't you!?

So anyway, always wanting to be an overachiever I felt the need to create what I like to call "the faux blizzard" techinque... well... um that or I accidentally managed to somehow get white paint all over my fingers, and then discovered that I had also unknowingly  managed to smear it all over my project. I'll let you decide which version of the story is the truth. *wink*

Supplies: Kraft cardstock - The Paper Studio; Patterned Papers - Little Yellow Bicycle; Letters - Tim Holtz Grungeboard; White Paint - Ranger; White Pen - Sharpie; Circle Punch - EK Success; Pearl - Queen&Co; Ribbon, Snowflake Punch -Martha Stewart

Here's how to create the "Faux Blizzard" Paint technique seen at the bottom of the card
  1. Get paint on your fingers. Not tons, but enough to create a few solid spots of paint on the kraft cardstock. 2. Do a little finger painting. (Anyone else thinking of a quote from the movie "The Cutting Edge" right now? No. Oh... um... never mind then.) Using your painty fingers add a few dots and a few streaks of solid white to the punched area. 
  2. Let solid paint dry. (If you're impatient like me, speed up the process with a heat gun.)
  3. Water down the paint in a Ranger Snow Cap dabber. You can do this by squirting a few shots of water from a mini mister and then mixing the water into the paint with a popsicle stick. Otherwise, sometimes (if you haven't used your paint in awhile) if you don't shake it before applying it, you can get a watery affect too.
  4. Swipe the top of the dabber across the die cut area to get a streaky paint effect. If it's too thick use a damp paper towel to lift off some of the paint until you get the desired effect.
  5. Make sure you do this BEFORE you add your patterned paper!