

In October I participated in the Maya Road Challenge on Two Peas in a Bucket and was one of the lucky finalists. When my package of Maya Road goodies arrived (Thank you Maya Road!) there were several of the Journey Tins included and I thought they'd make adorable little shadow boxes. And then I thought, what's more adorable than a shadow box? A shaker box! So I compiled all of those ideas into one fun little door hanger.
Here's how to make your very own...
Materials Used
- Chipboard Background – page from a Maya Road Mix it Up Mini Album (also won in the Two Peas Challenge)
- Patterned Papers – K and Co (Swell Noel line)
- Playing cards - dollar store
- Metallic pipe cleaner – Michaels
- Chipboard Bird – My Minds Eye
- Chipboard Flourish (bird wing) – Maya Road Decorative Scrolls Chipboard Set
- Blue and red chipboard frame – Maya Road Ornate Tags Chipboard
- Metal tins - Maya Road "Journey Tins"
- Paints, Inks, and Alcohol Inks – Ranger
- Gingham Ribbon – Craft Supply
- Jingle Bells – Craft Supply (Michaels)
- Jump Rings – Tim Holtz
- Snowman – Maya Road Trinket Pin
- Red floss (snowman scarf) – DMC
- Micobead Glitter – Martha Stewart
- Poinsettia Brad – Creative Imaginations (have also seen a very similar one in a Paper Studio brad set at Hobby Lobby)
- Wreath – Craft Supply from Michaels
- Holiday pieces - Dress it up from Michaels

- Paint the inner piece with a red pepper dabber, then using a cotton swab or paint bush, add a little bit of a darker red dabber (or distress ink) to create a weathered two-tone effect.
- Paint the outer piece with a light blue dabber and add a little bit of a darker blue dabber (or distress ink) over the top to create a weathered two-tone effect.
- Add "happy holidays" pieces to center of red piece.
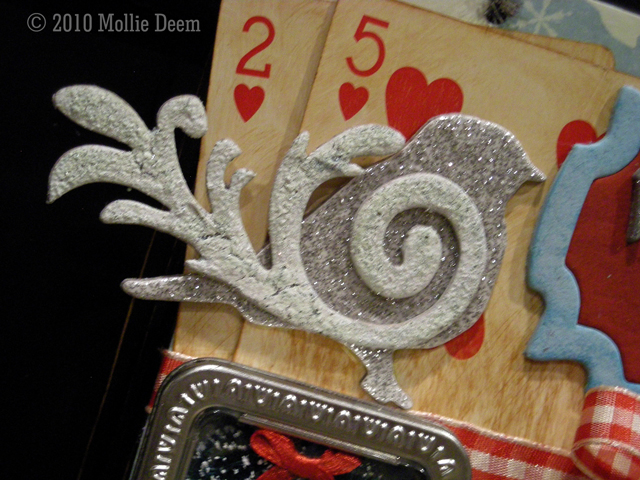
- Start with a My Minds Eye chipboard bird as the base.
- Use a Maya Road chipboard flourish for feathers. Spray with metallic silver Maya Mist. Then, paint with a thick layer of Tim Holtz Crackle Paint (Picket Fence) using a stippling technique to build more texture. I am impatient, so I use my heat tool to speed up the drying process. Once dry, spray with a mini mister that has water plus 8 drops of antique linen reinker (or just tint it down with a little antique linen distress ink).
- Glue flourish to bird.
- Sand bottom half of the playing cards with very fine sand paper.
- Apply 1-3 small drops of butterscotch alcohol ink to the alcohol ink applicator
- Working over a splat mat Rub the alcohol ink onto the playing cards until you have the color you desire. If you get too much, you can remove it with alcohol blending solution. You can also add a drop of alcohol ink to the applicator to re-wet the already applied ink and rework it. I also used a new felt applicator to buff off the excess.

- Wreath tin
- In the large square tin, punch or cut a square of the blue patterned paper. Use a small corner rounder to round all four corners. Apply glossy accents to the back of the paper. Glue the paper to the inside of the tin by wiggling it around a little and then letting it dry.
- The wreath will be a little too thick to fit. Gently flatten the back side of the wreath without flattening the front. Place inside the tin.
- Apply a little glossy accents around the edge of the tin and then fit the lid on. Hold for 10-15 seconds to allow the glue to set a little.
- Poinsettia tin
- In a small sqaure tin, punch or cut a square of green accent paper. Round the corners with a small corner rounder. Apply glossy accents to the back of the paper. Glue the paper to the inside of the tin by wiggling it around a little and then letting it dry.
- Remove the prongs from the back of the poinsettia brad. Glue the brad to the background paper using glossy accents.
- Apply a little glossy accents around the edge of the tin and then fit the lid on. Hold for 10-15 seconds to allow the glue to set a little.
- Snowman tin
- In a small sqaure tin, punch or cut a square of pink accent paper. Round the corners with a small corner rounder. Apply glossy accents to the back of the paper. Glue the paper to the inside of the tin by wiggling it around a little and then letting it dry.
- Making the little snowman
- Tie 3 strands of red embroidery floss between the top and middle to create the scarf. Use wire cutters to cut off all but a little bit of the metal pin.
- Put a 1/8" pop dot on the bottom left edge of the tin. Put a few small drops of glossy accents on the back of the trinket pin and then push the snowman into the pop dot to hold it in place.
- To create the "landscape" fill the bottom with glossy accents varying the height to create the shape of little mini hills. Pour some Martha Stewart micobead glitter in to the tin at the top.
- Apply a little glossy accents around the edge of the tin and then fit the lid on. Let the microbeads
- Remove a the page with scalloped edges from the Maya Road Mix it Up album. Cover it with the Santa paper from the K and Co Swell Noel line. (Don't forget to punch out the holes! I used the crop-a-dile).
- Add the playing cards to the upper left corner.
- Fit the journey tins across the bottom of the page just above the holes. Lightly the mark the top of the large and small tins. Apply wonder/tacky tape to the back of the ribbon and glue it to the page before gluing down the Journey tins.
- Place the bird so it's feet are just above the large tin.
- Glue the "happy holidays" plaque on a slight angle in the upper right corner.
- Using the large Tim Holtz jump rings, hang jingle bells along the bottom. Open the spring rings by bending one end forward and the other end backward rather than pulling the ends apart.
- Attach a pipe cleaner through the binding holes. Bend about one inch from the end and twist around the pipe cleaner.
2 comments:
Way to go, Mollie!
Congrats, Mollie! What an adorable project!
Post a Comment