Showing posts with label bazzill. Show all posts

Thursday, September 5, 2013

Tools n' Techniques on Thursdays: Die-namic layout!

Okay, so when I started out on this layout, I hadn't really intended to go all out on the die cuts, but as I got into it...well, they kind of just started piling up. And I kinda decided to indulge and just keep adding more and more of them.

Previously I had die cut some words with my Cameo for another layout and had the negative left over. I've been on a kick to use up every little last scrap of paper lately and I wanted this layout to coordinate with some with other pictures from the day, so I figured that adding the leftover piece would be a good way to do that.

In the top corner of the "Sunday Funday" negative die cut, a chunk of the paper was missing where I had test but to make sure the blade depth was set correctly. There wasn't room to trim away the area, so I added a little banner and star embellishment to cover up the missing paper. You'd never know that I was solving a problem would you?!


Right now cork letters are popping up everywhere. I love them, but they're a wee bit pricey, so I pulled out my favorite QuicKutz font, Studio, and some adhesive-backed cork from Lifestyle Crafts to cut my own letters.
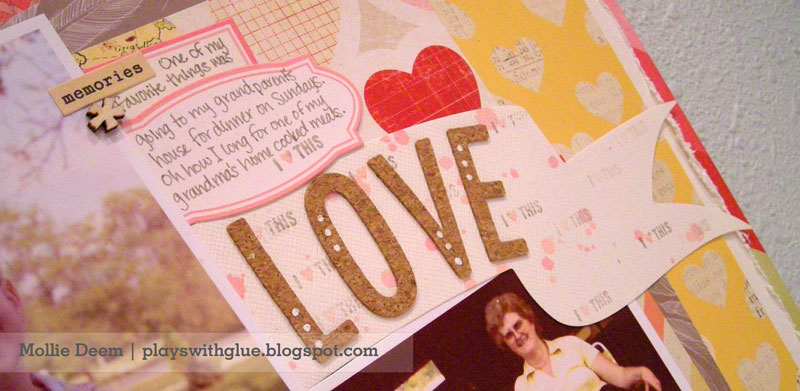
Tip: Handle the letters carefully as the cork is a little delicate.


The page felt like it need a little "oomph." You know, that thing that draws the eye in and gives it a little movement, a little excitement. So I pulled out my Lifestyle Crafts banner die to create that element, but a plain ol' chunk of cardstock seemed a little boring for a page with so much going on. In order to dress up the die cut and give it some personality of it's own, I stamped on it using a roller stamp that I colored with Tim Holtz Distress Markers. One of the great things about the Distress Markers is that you can get second and third generation impression simply by huffing on the stamp in between impressions. I also added some two-tone ink splatters just for good measure.

Tip: The banner itself wasn't fitting on the page quite right, 
so I cut it where I could hide the seam under the photo and made it work with the layout.


Pretty amazing what you can accomplish just by die cutting something as simple as a sheet of paper, huh?

"Love This" by Mollie Deem
Supplies: Cardstock - Bazzill; Patterned Paper - Crate Paper (the Pier), American Crafts (Dear Lizzy Lucky Charm), Studio Calico; Wood veneer banner - Basic Grey; Wood Veneer Letters - Studio Calico; Wood Veneer Arrow - Freckled Fawn; Stickers - Crate Paper (DIY Shop), October Afternoon; Cork, Cutting Dies - Lifestyle Crafts; Pens - Ranger, Uniball; Mist - October Afternoon; Adhesives: EK Success, 3L Adhesives; Kokuyo.

Thursday, March 28, 2013

Tools on Thursdays: Hippity Hoppity, Easter's on it's way!

Are you ready for Easter?

I'm not!

But I'm getting closer :)


I picked up a few little surprises for my nieces for Easter this year, but didn't want to go the expense of doing full-fledged Easter baskets (that's their parents' problem). But I did want to do something fun with the gift packaging.

My oldest niece is totally and completely obsessed with all things princesses right now. (And for the sake of her future husband, lets hope that she outgrows the phase eventually.) When I sent a text message to her mom to ask which princess was her favorite, her only response was, "I'm a princess!" And when I asked her dad which was her favorite he said she liked them all. And that answer + a Jolee's Boutique sticker were the jumping off point for creating her Easter bag.

I pulled out my trusty Silhouette Cameo and embarked on creating the best darn fairy tale Easter egg she'd ever seen. (Well best-darn fairy tale egg that can be created quickly anyway.) Using a few simple shapes from the Silhouette online store and a free font off of the internet, I created the Easter egg background to add the ensemble of Disney princesses to. Seriously, could that font be any more perfect?


Supplies:

  • Silhouette Cameo
  • Cutting Files: Easter Egg Stitched Candy Pouch; Moroccan Background (I don't see that exact one in the online store, but you could pick something similar)
  • Cardstock - Bazzill in True Teal, Lily White, Purple
  • Adhesives: Xyron Cheetah and Tape Runner; EK Success.
  • Font: "Christmas Card" (free internet download)

Dimensions:
  • Larger egg
    • Egg = 8.665" high x 6.995" wide
    • Happy Easter = 1.915" high x 6.005" wide
  • Smaller egg
    • Egg = 5.565" high x 6.885" wide
    • Happy Easter = 1.520" high x 4.780" wide
  • Tips:
    • Use heavy weight cardstock (80# or more) since the lattice is delicate and prone to tear if using lighter weight paper.
    • I wouldn't recommend cutting it much smaller than the smallest egg.
    • Make sure to use a new/fresh blade so that your lattice work cuts nice and crisp.
    • If you have a 9" Xyron Creative Station, that would make life much easier!


 To create the egg:

  1. Open the "Easter Egg Stitched Candy Pouch and ungroup the objects.
  2. Using the pointer tool and the "delete point" option to edit the egg to remove the stitching holes.
  3. Use the offset option to create a shadow for the remaining egg and move aside.
  4. Open the "Moroccan Background" and lay it on top of the smaller egg piece (make sure the background is the top layer). 
  5. Select both the egg and the background. Then under Modify > select the Subtract option. 
  6. Type the words "Happy Easter" in a font of your choice. Use the offset option to create a background shadow around the words. (I think I used a 0.125" offset.) 
  7. Arrange the words offset over the egg so the beginning and end of the phrase overlaps with the lattice and the egg edge. Select both the word background and the lattice background and then use the weld option to add it to the lattice overlay that we're creating.
  8. Separate your "parts" onto separate files. 
    1. Happy Easter words (cut in purple)
    2. Egg background (cut in teal)
    3. Egg overlay (cut in white)
  9. Cut and assemble your egg.
  10. Add to bag. (I used a combination of the Xyron Cheetah and Tape Runner to glue the egg to the bag. I used a glue pen to adhere the lattice to the background egg, but this would have been soooo much easier if I would have had a 9" Xyron Creative Station so I could have just run it through and stuck it down.)
  11. Done! :)