Today I am bringing you a layout the can be created in 30 mins (or less if you are super speedy) that I created for The Scrapbooking Studio design team.
Here's how:
There you go! A quick and easy layout. Done and done. :)

Supplies: Paper and Stickers - American Crafts; Dresden plate pattern - McCall's (resized in CorelDraw); Printer - Epson; Pen - Copic; Adhesive - Kokuyo.
- Start up your computer and while it's booting connect your printer and gather your supplies.
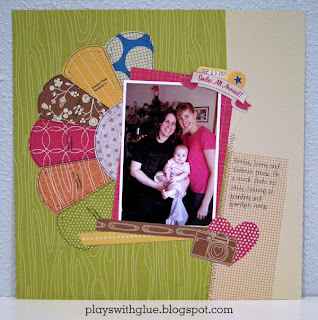
- Cut 4" wide by 6" pieces from 7 different pattern papers (these are going to be the dresden plate quilt pieces).
- Open the dresden plate print file and print 6 of the 'petal' pieces and then 1 of the center circle pieces. (Don't forget to set your page size to 4" wide by 6" high.)
- While the pieces are printing, use a craft knife to cut along the upper left corner of the camera and then along part of the edge of the heart. Cut just enough to tuck in the photo mat and picture plus a few strips of paper.
- By now the pieces should be done printing. Open your photo and print it at 4" wide x 6" high with a white border.
- While your photo is printing, trim out the dresden plate pieces. You can speed up this process by cutting the straight sides with your trimmer and then fussy cut the curved edges with scissors.
- Using a date stamp, add the date to an index tab sticker. Set aside to let the ink dry. (I used Versafine Sepia on an October Afternoon Cherry Hill collection sticker.)
- Your photo should be done printing and had a little extra dry time while you were completing items 6 and 7. Grab it off the printer, lay it over the paper you want to use and use your trimmer to cut the photo mat about a half inch larger than the photo on two sides. (Remember, dont measure it out. Just eyeball it so you can finish in under 30 minutes!
- Put adhesive on about half of the photo mat and slide the lower right corner into the slit that was cut around the camera and heart. Let it sit lightly tacked. DON'T FIRMLY ADHERE IT YET.
- Put a little adhesive on the back of each of your dresden plate pieces. Arange them by sliding the pieces under the photo mat and put the circle on top of the pieces.
- Add photo corner to upper right corner of photo mat, add photo, then add star and banner stickers.
- Cut paper strips to length and add to the bottom of the photo, making sure to tuck the right ends under the slit.
- When you are happy with the arrangement, then press all of the pieces down so they are firmly in place.
There you go! A quick and easy layout. Done and done. :)
2 comments:
goodness a 30min page? that is craziness :)
I'm not sure if you think that's fast, or super long - LOL!
Post a Comment