Sunday, December 23, 2012

Made it from scratch: OA Make it Merry Mini book base


First off - my apologies. I meant to get this posted last Sunday, but then wasn't feeling well and the next day had an allergic reaction to some medication and I'm just now getting this post finished and up on the blog for you all.

So you've completed all of your pages, now it's time to tackle the book base and binding.

For this you'll need:
  • One piece of 12" x 6" grunge paper. (Make sure to use grunge paper since it's thinner than grunge board and much more suited for this application.)
  • Two of the grunge paper scraps that were left over when you were making the page bases.
  • 3 eyelets
  • One Tim Holtz hitch fastener.
  • One elastic from 7ge.
Can you believe that we're going to turn this...


into this?

It's like a Christmas miracle, right!?   :)

This takes a little while to do, so grab your favorite cuppa somethin' and let's get started shall we?

First up, you need the piece of 12" long x 6" tall  grunge paper and one of the 2" (ish) wide x 6" tall scraps along with the large ring binding mechanism.


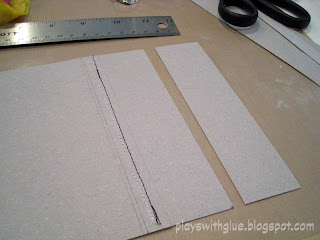
Using a ruler, draw a pencil line 1/2" from the left edge of the large (12" x 6") piece of grunge paper.

Measure 5-7/8" from the left edge and draw another pencil line.

Measure 1/8" in from the left edge on the small (2-7/8" x 6") piece of grunge board and pencil a line. Place the ring binding mechanism on the piece and align the left edge to the pencil line, centering between top and bottom. Once it's centered, trace the holes in the ring binding mechanism (at the top and bottom) where the you'll put the eyelets (instead of the brads it comes with) to attach the binding mechanism.

This leaves you with a little edge of the cover sticking past the pages (see below).


Punch the binding holes using a 1/8" hole punch (I used my crop-a-dile to do this. You can use the handheld or the Big Bite to do it.)

Trim the merchandising strip off the bottom half of "Make a List" (PP-684). Then cut the paper in half so it's 12" wide and 6" tall. Save the top half and set the bottom half aside to use for the outside part of the cover in a bit. (We'll use the back side of the bottom half for the outside cover.)


Next,  transfer the line on the grunge paper to the back of your interior pattern paper. Then transfer the the marks for the binding mechanism holes too. (Hint: Lay the pattern paper face up on top of the page then, lift at the bottom and turn it upside down -so what was the bottom edge of the paper becomes the top- and do the same with the grunge paper piece as well.) Once you've marked where the binding mechanism holes are, punch those with the Crop-a-dile too.


Push 1/8" eyelets through holes and place the small piece of grunge paper back on the large piece. (I used oval ones that I happened to have since those would offer more support, but you can use round ones too.) If you didn't get your binding mechanism aligned perfectly centered from top to bottom, it'll be important to make sure you have your top and bottom oriented correctly. Put a little adhesive on the back between the two eyelet holes and put on the small piece on the large piece, aligning to the line drawn 5-7/8" from the left edge.

Then stitch vertically on the left and right edges of the small grunge paper piece, DO NOT stitch the top and bottom.


 (If you forget to insert the eyelets in the step before this, you can do it here... assuming you have good manual dexterity. I mean I totally didn't do that... right!)


Move over to the left edge of the large piece of grunge board. Take the second smaller piece of grunge board (2" wide x 6" tall) and align it to the 1/2" line and stitch it to the cover (This will leave a little ridge on the inside of the cover and an uneven front cover.

Align and fit another piece of grunge paper to fill the void on the front. Then glue it in place (but make sure not glue within 1/2 of the top, bottom, and outer edge (you'll be stitching along those edges later).

When you're done, you should have a flat cover like this:

Now we'll work on the outside of the cover. Remember this paper that you cut in half earlier? Grab the bottom half that you saved earlier and flip it over to the side with the lines.

Flip the bottom half paper piece over to the backside so that it's cream with lines. Cut the paper down the middle 4-3/4" from the left edge. 

Glue the left piece to the left edge of the outside cover and the right piece to the outside edge of the right edge of the grungeboard. (There will be a gap in the middle and that's okay. See image above.) Keep the glue 1" away from the outside edge of the paper. Once you've glued it sew two lines of stitching about 1/8" apart from one another on the top, left, and bottom edges.

For these next couple of steps, I forgot to take pictures so we'll have to wing it a little bit okay?

  • From the 8x8 paper pad tear out the sheet that is red with cream polka dots. Trim to 6" high by 8" wide.
  • From a 12x12 piece of the PP676 - Make a Card, cut out the "Here comes Santa" in the lower right corner. 
  • Draw a line 2.25" from the right edge of the cover. Put a thin line of adhesive on the bottom right side of the red polka do paper, align to the left edge of the line and affix.
  • Add adhesive to the middle of the back of the "Merry Christmas" santa that you cut out. You just need enough adhesive to tack it in place while you stitch it. Align the right edge of the yellow piece about 1/4" from the right edge of the cover. It should just cover the black lines on the right, and overlap the edge of red polka dot paper on the right.Then stitch up and down the the edges of the of the yellow piece about 1/16" from the edge -don't try to make it perfect... give it a little character!
Time to PAY ATTENTION :)
This is where things will get a little challenging because you can't just lay everything flat and stitch since the red polka dot paper won't stretch to wrap around making the curved spine.

Add a little glue 1/2" from the left edge of the polka dot paper and affix so the edge is about 3.75" from the left (back) edge. When the grunge paper is laid flat it will have a bubble in the middle. Stitch two rows of stitching along the left edge.

At this point, the front cover should be complete. Yay!

Completing the Inside Cover

Find the top half of the "Make a List" paper that you set aside earlier. "Fayx" stitch around the outside edges of the paper about 1/4" from each edge.

Now you'll still have an exposed piece of grunge on the left side. Grab a scrap of blue and white snowflake paper and trim to 6" tall x 1.5" wide. Run stitching vertically on the left and right about 1/4" from the edge. Glue to grunge paper aligned to the outer (left) edge and under the "Make a List" paper.

Fit the piece over the two eyelets.

Fit the binding mechanism over the eyelets and secure with an eyelet setter. Glue down the "Make a List" paper.

Next, measure to the vertical center of the right edge of the front cover (next to the "here comes santa") and punch a 1/8" hole using the Crop-a-Dile. Attach a Tim Holtz Hitch Fastener.

Measure to the vertical center of the right edge of the back cover and punch another 1/8" hole (Near the candy cane). Put an eyelet through the hole and set with the Crop-a-dile. Push a Seven Gypsies (7ge) elastic fastener though the hole so it makes a loop.

Place the page you made into the ring binding mechanism.

And you're finished. Sit back, admire your work and then pat yourself on the back because you just made an entire album from scratch. Way to go! :)


Saturday, December 15, 2012

Made it from scratch: OA Make it Merry Mini - Page 6

We're down to the last page today. Here we go!


Add green chevron paper to the page base. Layer a 1" (ish) strip of candy cane paper on the right edge. Punch binding holes.

Sew lines from edge to edge on all 4 sides.

Cut a piece of red sequin trim to 5.5" in length and affix between the stitching with very thin (1/8") red line tape and then stitch across the ends with the sewing machine.

Draw lines on the small snowflake and large snowflake (you can stitch it, but it's hard and tedious). Put the Joy and red plaid brads from the Decorative Brads set through the centers of the snowflakes.

Get out the Santa Claus flash card and put it just above the antlers. Affix it to the page just under the top stitching and tucked under the sequins.

Slip the :Sleigh bells" die cut and the bottom half of the Santa Claus card under the photo, determine it's placement and stick it down. Affix the photo (sized to 3.75" square) over the top. Draw a line around the "sleigh bells" text.

Punch holes through the grunge board, stick the brads through and secure. Layer the smaller snowflake on top of the larger snowflake.

Grab the remaining piece of word strip and trace around three of the words with a pen. Affix at the top of the photo. Add a tiny attacher staple on the right end.

Pat yourself on the back. You've finished 6 pages in 5 nights!

Get a good night's sleep, and come back to tackle making the book base tomorrow :)

Friday, December 14, 2012

Made it from scratch: OA Make it Merry Mini - Page 4 & 5

We're gonna get a little crazy today and do pages 4 and 5 together.


The patterned paper from page 5 blends with page 4, so you'll need to cut it and work on these pages together.

First cut the background pieces.
-For page 1 cut the numbers paper along the right edge of the square (this will be a little short of 5") and 6" high.
-For the right page, cut a piece of the ledger paper to 5-3/8" wide x 6" tall. Then cut a 3/8" strip from the left edge of the ledger paper.

On the left page (page 4) Affix the numbers paper to the background. You aren't going to stitch over this piece so glue it down good!

Layer the 3/8" ledger paper over the edge of the numbers paper and flush to the right edge of the page. Add a short length of stitching right along the outside edge and full length of stitching about 1/4" from the edge.

Size and print your photo at 3.5" square. Add a white boarder at 1/8" (or mat the photo on white cardstock to add the border). Then mat the photo onto a square of black cardstock that is 4" wide by 4.5" long. Mount the photo toward the top so there's a strip of cardstock about a half-inch."

Cut out "Greetings Merry Christmas" from the words paper scrap. Stitch a line between "Greetings" and "Merry Christmas," then tuck it under the photo mat so there's just a little bit of the "greetings" showing and it hangs over the edge just a little bit.

Mount the photo just under the numbers 1, 2, 3. Add a strip of "To/From" washi tape so that the stripe sticks up onto the pattern paper. Layer the year number stickers (black and cream mini market stickers from the Thrift Shop line). Stitch across the bottom of the letters.

On a strip of snowflake paper, stamp the phrase "Merry and Bright" from the stamp set in the Make it Merry Kit. Trim it into a strip about 3" long and 7/16" high. (Honestly, I just eyeballed it when i cut the height.) Trim the end into a point to make a banner. Outline with a black pen (I used a .03 nib).

Place the pink snowflake sticker from the word sticker sheet onto a 1.25" chipboard circle.

Put 1/8" foam tape on the back of the label sticker from the Designer Brads set. Outline with a black pen and add journaling.

Glue the "Merry and Bright" banner strip down first, then the snowflake, and finally the label with the green brads added.

...and you're done with page 3, so it's on to page 4.


Page 4
Put the yellow ledger paper that you already cut. Affix it to the grungepaper and punch your binding holes. Stitch up and down the left and right sides of the page about 3/8" in from each edge.

Pull out the chipboard tree from the Holiday Style Miscellany set. Color it with white Distress Stain. The idea is to give it a mottled effect to emulate snow. To do this work in layers pouncing the stain applicator with uneven coverage. Set aside to dry.

Grab a sheet of the Holiday Style Snowflake rub-ons. Apply around the outside of the pages with a cluster around the 2 bottom corners where the photo mat will sit and at the upper corners of the edge. letting your snowflakes sit partially under the photo mat and partially off the edges of the page will give it visual interest. Stamp "have yourself a merry little christmas" at the top.

Size the photo to 3.5" wide by 3-5/8" high. Add a 1/8" inch white border by either leaving a little white when you trim the photo or add a white piece of cardstock to mat the photo. Then mat on a black square cut to 4" square. Attach the "gifts" tab on the right about 7/8" from the top of the photo mat and add some messy stitching along the bottom of it. Affix to the page just under the header column text.

Add some black stitching to the tree to make a "trunk" in the center. Add the tin pin with the little red bird. Tuck half of the "happy christmas" banner from the Little Flyers under the tree. And affix the tree.

And with that, you've finished two pages. Yippee!!!

Thursday, December 13, 2012

Made it from scratch: OA Make it Merry Mini - Page 3

Today's page is fairly simple, so let's get started shall we?


First off, take out one of the Tin Holtz seasonal Christmas Muse Tokens and add white paint to it. Allow the paint to dry a bit and then lightlightly wipe the paint off of the raised areas. Grab a safety pin and add paint to it as well. Set both aside to dry while you work on the rest of the page.

Next take the leftover strips from the first page and cut 2 strips that are 5" wide by 1.5."

After that cut a piece of yellow striped patterned paper to 5" wide by 3.25" tall.

Glue down the two snowflake pieces first and then the yellow piece. If you plan to stitch on your layout make sure you don't have adhesive in the stitching area. If you're not going to stitch it, then make sure you glue it down real good. :)

Punch the holes for the binding using your template and stitch around the page about 1/4" from the edge.

Cut a piece of May Arts green chevron ribbon to 24," wrap around the page and tie in a bow at the top.

Size photo to 3.5" wide by 3.5" high. Leave a white border around your photo or mat it on white (3.75"w x 3.75cardstock. Then mount onto red cardstock sized to 4" x 4." Mount over the top of the ribbon to the background page.

Hopefully by now your paint on the Christmas Muse Token is dry. Put it on the safety pin and attach to the knot in the ribbon bowl.

And...that's it! You're done!

Wednesday, December 12, 2012

Made it from scratch: OA Make it Merry Mini - Page 2

It's time for page 2!

(And I'm not really sure why my sister thought it was hilarious and I clearly wasn't enthused, but hey... it a memory, right?)


Alright, grab another page base and add a piece of 5"wide x 6" high pattern paper from the October Afternoon 8x8 paper pad. Adhere to the page base and patterned paper together.

Face the back of page 1 to the back of page two. Trace the location of the ring binding holes onto the second page, then punch the holes with a 1/4" punch.

Stitch the edges. This time I just sewed straight lines and let them cross in the corners.

Photo size: 3.5" wide x 3.75" high.
White mat size: 3.75" wide x 4" high.
Green cardstock mat size: 4" wide x 4.5" high.
Make a photo + mat sandwich and set aside for a minute.

Cut a piece of black chevron May Arts ribbon to 5.5 inches and notch the ends.

Cut a piece of silver tinsel pipe cleaner to 4.25" long.

Cut a piece of Maya Road white roses trim to 4."

Use double sided tape/red line tape to affix the black chevron ribbon on the page so that the notch in the banner fits around the bottom binding hole.

Affix the photo + mat stack so it sits partially over the black chevron ribbon.

Sew the raw edge of the roses trim over the bottom edge of the black chevron ribbon

Affix the silver pipecleaner along the bottom of the black chevron ribbon using a tiny attacher.

Cut a section of the word strip out of the Holiday Style Miscellany pack. Outline it with a thin black pen (I used a .03 nib). Attach it to a scrap piece of the snowflake paper and trimmed out leaving a border.

At the top add the rectangular label from the Witch Hazel label set.
Add the year using the numbers from the Peppermint Mini Market stickers.
Get out "December 2012" stamp from the set that comes in the Make in Merry Kit. Ink only the "December" part of the stamp. Then grab the "Hey Santa!" stamp, ink it and stamp it above where you stamped "December."

Clean your stamps (or not) and you're done!

Tuesday, December 11, 2012

Made it from scratch: OA Make it Merry Mini - Page 1

Before we get started on the first page, let's do a little project prep work okay?
 
First we need to make our base pages (6 in all).
  • Pull out 3 sheets of 6" x 12" grunge paper.
  • Cut the sheets into pages that measure 5" wide and  6" tall.
  • When you are finished you should have 3 - 5" x 6" pages and 3 scraps about 2" wide x 6" tall. *Make sure to save the scrap pieces too (you'll need them for the cover later).*
  • Optional step: I painted the edges of the pages with a Ranger Paint dabber (sandal) so that they grey of the grunge paper was covered, but you can leave the grunge paper raw if you'd like.
One thing to note: as you work through the project make sure to save your scraps. We'll be using them on future pages!

Here's the first page: 

Okay, now we're ready to make the first page. Here are the supplies you'll need:
  • Snowflake paper from the 8x8 October Afternoon Make it Merry paper pad.
  • "No." Label from the October Afternoon Witch Hazel label set.
  • Teal button from the October Afternoon Make it Merry button pack.
  • "Christmas wishes" sticker from the October Afternoon Make it Merry Little Flyers.
  • Red baker's twine from the October Afternoon Make it Merry kit, or other red twine.
  • Black chevron ribbon from May Arts
  • Corrugated heart from Jillibean Soup (or punch your own).
  • "1" brad from Basic Grey "Clippings" line.
  • Adhesives: Red line tape, 1/16" thick foam tape, runner adhesive
  • Other: Sewing machine and black thread. (If you don't want to sew you can just do pen stitching with a black pen.)

Directions:
  1. Cut the "Make a Song" (snowflake) paper to 5" wide by 6" tall.
  2. Cut a strip of the "Make a Garland" (the strip with the blue and black text) paper where it meets the next patterned strip and trim to 6" in length.
  3. Adhere the first two pieces to the grungepaper page base. (If you are planning to stitch the paper, make sure that you don't apply the glue where you'll be sewing. keep the glue about 1" from the edges.) If you aren't going to stitch the pages, make sure to glue thoroughly and be forewarned that wet glues will cause the grungepaper to buckle and warp if applied too thick.
  4. Create a template to determine where to punch the holes in the page for the binding.
    1. To do this I got out the ring binder, a scrap piece of grunge paper, a ruler, and a pencil.
    2. Place the ruler flush to one side of a ring and draw a line onto the scrap grunge, repeat this until you've drawn lines for each side of the two binding rings.
    3. Measure 1/2" in from the left side and draw a line the length (6") of the piece. This will create an "cross-hairs" (intersection) with the ring binding marks. Punch a 1/4" hole at each of the two intersections.
  5. Use your new punching template to mark where to punch your page, then punch the 1/4" holes in the page.
  6. Sew a rectangular border around the the page about 3/8" from the edge. (Start on the side where you punched the holes.) If you don't want to sew for real, just draw stitching marks with a black pen instead. (Personally I like to use a fine or med point American Crafts Slick Writer for doing pen stitching.)
  7. Size and print your photo at 3.5" wide x 4.5" high. Then either leave a 1/8" white border around the photo when you trim it, or mat the photo on white cardstock.
  8. Cut a piece of green cardstock to 3-7/8" wide by 5" tall. Mount photo to green cardstock. Mount this to the page just inside of the stitching lines on the right.
  9. Cut a piece of black and white chevron ribbon to 3.5" long. Turn the top under about 1" from the end and stitch to make a loop at the top. Trim the end to make it look like a banner. Add red line tape to the back. Adhere to the upper left corner of the page.
  10. Grab the "Christmas Wishes" mini banner sticker from the OA Little Flyers set, add 1/16" thick foam tape to the back and layer on top of the black chevron ribbon.
  11. Cut a piece of red baker's twine to 36" (3 ft). Wrap it around the page twice and knot it about 1-1/4" from the top of the page. Slide a teal button onto the twine and then tie the twine in a bow.
  12. Add red line tape to the back of the corrugated heart and tuck it partially under the ribbon and button.
  13. Add the black "No." label to the lower right corner, folding part of the sticker around the back of the page. Poke a hole through the label, paper, and grungepaper. Push the brad through and spread the back.
Page finished! (And hopefully in less than an hour.)

Monday, December 10, 2012

Made it from scratch: OA Make it Merry Mini

Visiting Santa Mini Book by Mollie Deem
For those of you with more modern photos,this little mini would be perfect for instagram photos too!

When I was home for Christmas last year my mom had displayed photos of my siblings and I visiting Santa at the mall. Like a sneaky little elf, I grabbed them for a quick scan so I could reprint them and make a little mini book later. So last weekend I got an idea and I thought it would be fun to make a little album for my sister for Christmas, but there was just one problem... with only 6 photos needing just 3 pages, using plain paper would make for a pretty wimpy (aka sad and pathetic) little book. So, I needed to come up with a way to give 3 little pages some substance! Thus the grunge paper mini book idea was born.
 
(And my friends will be shocked to learn that I finished this baby in less than a week! -And so can you.)
 
Here's my strategy:
-Make the cover on the weekend (it takes a little while to get done).
-Make one page a day... in just about an hour a page.
-Have a fabulous gift you want to keep for yourself in less than a week's time :)
 
So, want to make this album too? Here's what you'll need:
  • October Afternoon Make it Merry:
    • One Make it Merry kit (sold out)
    • One sheet of PP676 - Make a Card
    • One Sheet of PP684 - Make a List
    • One package of buttons
    • One package of Flyers
    • One package of brads
    • One sheet of SS446 - Word Stickers
  • One sheet of Oxcober Afternoon Witch Hazel SS437 - Label Stickers
  • One sheet of October Afternoon Black and Cream Mini Market Stickers
  • One package of 6"x12" grunge paper from Ranger/TIm Holtz
  • Ring Binder - Large, Advantus/Tim Holtz Idea-ology Collection
  • One Christmas Muse Token from Advantus/Tim Holtz
  • One "hitch fastener" from Advantus/Tim Holtz
  • One safety pin from Making Memories (could use a Fastener from Tim Holtz instead)
  • One elastic tie from Seven Gypsies (7ge)
  • Green, Black Chevron ribbon from May Arts
  • 3 red 1/8" eyelets
  • "1" brad from Basic Grey "Clippings" collection
  • Silver pipe cleaner (craft supply, Michaels)
  • White roses trim, Maya Road
  • Red sequins trim (Recollections, Michaels)
  • 1.25" Chipboard circle, Bazzill
  • Corrugated heart from Jillibean Soup
  • Sewing machine and black thread
  • .03 Black Pen
  • Wonder tape, American Crafts
  • 1/8" Tacky (Red line) tape, Provocraft
  • Strong runner adhesive (I used a combination of the Xyron Cheetah and the Xyron Tape Runner with permanent adhesive.)
  • Clear stamp block
  • Versafine Black ink
If you don't have a Make it Merry kit from October Afternoon, you'll need the following:
  • October Afternoon Make it Merry:
    • Tin Pins
    • EM462 - Washi - To/From
    • 8x8 Paper Pad
    • Tin Pins
  • October Afternoon Holiday Style:
    • Snowflake Rubons
    • Miscellany pack
    • SS448 - Mini Market Stickers (peppermint)
  • Red baker's twine
So go gather up your supplies and come back tomorrow to learn how to make the the first page in about an hour.


Wednesday, November 21, 2012

Cards on Wednesdays returns!

Awhile ago October Afternoon sent me a box of goodies. And then I was all busy with life. You know, that thing that just seems to get in the way of scrapping all the time? So last weekend I finally had a chance to dip my toe into that big box of creative goodness and make a few cards.

Some scrapping buddies of mine helped me out with a vending thingy I did at a crop earlier in the month and were superheroes that came to my rescue when I needed help. What better way to say, "Thank you," than to make some cards with October Afternoon's new Midway line and to slip a little surprise inside?

So here is one of the cards I made. (Three of the girls haven't received theirs yet, so I'll post those another day.)

Nothing super fancy, but fun none-the-less. Now, keep in mind... I made these at the scrapbook store and arrived with nothing more than my purse and my brain (and  I'm sure some people are probably questioning whether my brain was really along or not). It was kind of a "Macgyver of Card Making" of sorts. The only items available to me were: the inventory in the store; the tools in the workroom; and whatever I could find in my purse (which sadly included no chewing gum so I had to buy adhesive - hee hee!).

So armed with a sharpie, 3 items from the "buttons by the piece" bin, a few sheets of paper, a sticker, a trimmer, and some new adhesive... this is what I whipped out:


Well... this and another card that I clearly forgot to photograph during my covert creative mission. (Oops!)

ANYWAY.... 
And of course the inside needed to be just as colorful as the outside (plus it needed a pocket to hold the surprise)!

Who says card making can't be simple, easy, and fast? I bet it would have taken longer to pick out a Hallmark and not nearly as cool! *wink*


Monday, November 12, 2012

Purge much?

At the beginning of November I was a vendor at The Get Inspired Expo, a 300 (yes THREE-HUNDRED) person all-day crop hosted by the very lovely and ever so sweet Minna. When I first signed up to vend I had intended to do something different with my booth and only signed up for a half day. Well at the last minute, I decided instead to do a major de-stash and sell my extra scrapbooking supplies instead. Yes, ladies, I did a cut-throat purge of nearly 12 year’s worth of scrapbooking goodies. Whew... I can't believe I've been scrapping that long...and even more, I can't believe I'm that much older already!

I've been scrapping for about 12 years now and I've never really "de-stashed" at all. So after tripping over too many supplies for days and days I finally decided that I was going to bite the bullet, get cutthroat about it and just PURGE, PURGE, PURGE my way to a better workspace.

And it all sounded like such a good idea until...

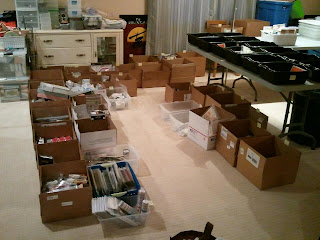
My basement started to look like this:
About 1/8th of the basement, mid-sort.

And that pile found a few more friends, and grew a bit bigger...
And at this point, my husband suggested we might need to get a trailer to haul it all.
(Good thinking dear.)

And then the paper started to pile up like this:
Yes, that's TEN bins of paper.


 And this is what it all looked like when loaded into the trailer:
And that's just insane!
 

And then it was such a crazy flurry of activity that I totally forgot to take pictures of the booth! So, just imagine 10x20 feet of scrapbooking supplies and a whole bunch o' scrappers okay? ;)
 
So on the big day, my booth was WAY more popular than anticipated and by 10 am we were swamped... and COMPLETELY out change. EEK! Fortunately some of my scrapping buddies were right by us and willing to make a bank run for me. Then, when it came time to shut down for the day we were asked to stay, but that meant packing up and relocating and re-displaying six eight-foot tables of scrapbooking supplies in under an hour. And again these fabulous ladies were kind enough to give up some of their scrappy time to help me out. Aren't scrappers just the best?
And we sold TONS of stuff, but still had quite a bit that came home with us too. Which I had to re-sort and re-organize before putting it away.
 
And now I'm really glad that's all done with! So, if I can just clean up the wake of destruction left in my scraproom, I'll be all set and back in business!
 

Tuesday, November 6, 2012

Tutorials on Tuesdays: Printing on die cut accents

I love journaling spots. I can't get enough of them. My favorites are the kraft ones from Maya Road and the journaling cards from October Afternoon. And while I like my handwriting and often do my journaling by hand, sometimes I want the effect of a certain font (like a vintage typewriter as shown below).


Click to bigify.
Font: Bohemian Typewriter
Journaling spot: Maya Road

Today, I thought I would share with you an easy way to make sure your journaling will show up.
  • Open a new document. (I use CorelDraw design software, but you could use other sofware like Adobe Photoshop Elements or Microsoft Word too).
  • Measure your die cut that you want to print on and add a box to your new document that is the same size. Make sure the inside of the box is white and that there is an outline showing.
  • Mark which end of the paper you load in the printer first. (Trust me, this will be VERY helpful later.)
  • Print out the page with the box on it.
  • Download a picture of the die cut from the manufacturer's web site. If it's a grouped image, crop it down to just the die cut you are using and crop it tight.
  • Place the downloaded (and cropped if applicable) image inside of your box. Measure your die cut and resize the downloaded image to match the size of your die cut. 
  • Turn off the outline of your box (set the color to none or white) so it won't print.  If you're using design software that allows you to place the image on it's own layer and set it to be view only (no printing) do that too.
  • Layer a text box over the image and type your journaling. 
  • Print the page out with the die cut and the journaling image. Now would be a very good time to pay attention to which end is up. :)
  • Once you're finished, if you can't set the image of the die cut to not print, delete the image of the die cut before printing. This will make a template to help you make sure you get the orientation of your die cut correct when you run the real one through.
  • Lightly affix your die cut inside of the box, over where the image of the die cut and journaling were.
  • Load it into the printer (now would also be a great time to make sure you load the paper the right direction).
  • Print
  • Voila! You have a printed journaling card ready to go on your next layout!

Tuesday, October 30, 2012

Cricut Holidays is available now!


I can't help it... I still get a little giddy each time I go to the store and find an issue that I have a project in. It's kind of like Christmas morning. ...The anticipation of the issue and the surprise of seeing what the writer and the photographer have done with your layout on the shelf before you -just waiting to be opened. And I always love how Northridge Publishing stages the layouts and cards in little themed vignettes, so I was really excited to flip through this issue quick and find my layout.

... And here it is :)
Merry Christmas by Mollie Deem as seen in Cricut Holidays 2012

...And then I always wonder what the store employees and other customers think of the crazy lady photographing the pages of a magazine right in the middle of the store! (Just buy the issue crazy lady!)

You can find instructions for this layout in a previous post found here and here.
If you'd like to make your own version of this layout (for personal use only please -don't sell it or teach it in a class) you can find the cutting instructions here.

Tuesday, October 23, 2012

November/December issue of Creating Keepsakes available now!


The latest issue of Creating Keepsakes is on newsstands this week. (Those of you who subscribe probably already have yours in your mailbox.) If you didn't get your copy, you can always go online and order a copy here.

And I'm happy to share a project that I made for this issue with you too! (It's on page 83 for those that want to follow along at home.)
"Elf Banner" as seen in the November/December 2012 issue of Creating Keepsakes magazine. 
Copyright Creative Crafts Group. Posted with prior permission from the publisher.


Sunday, October 7, 2012

Technologically handicapped

Graphics card + defective = computer not working.
Computer not working = blogging via cell phone.
Blogging via cell phone = blog with no pictures and limited words = BORING.
Sparing readers from boring = another blog hiatus.
Blog hiatus = sad face :(
(I may have had a few posts in the queue, so you may see a few of those, but that's it until the graphics card is repaired or a replacement arrives.)

Monday, October 1, 2012

Class with Dyan Reaveley!

Dyan Reaveley was coming to town (well not my town, but one about 3 hours away) to teach several classes, but I just fell in love with this canvas class sample:


I was on the fence about whether or not to go all the way to KC, so I posted a note on Facebook to The Scrapbooking Studio's DT Coordinator, Stacy Rodriquez to see if she or any of the gals from the store were heading down. Sadly, they were not, but Dyan jumped in to let us know her class was going to be "freakin' fabulous." And with her fun and spunky dialogue added to my decision making mix, I decided that  if she can hop across the pond and make it to Kansas, I could certainly make a 3hour drive to go see her.

Mollie Deem and Dyan Reaveley

But of course, every road trip needs an accomplice... er... uh... I mean a travel buddy. A "Thelma" to my "Louise" if you will, so I promptly rang up my friend Linda and chatted her up. I'm pretty sure I had her at, "you get to play with paints and get all inky." So now I had everything I needed... except for tickets to the class. The store was closed so I had to wait 2 more days until it opened to call for tickets, but fortunately there were 2 spots left. The plan was hatched, the tickets were paid for and all we needed next was a playlist and some snacks!

So the day came, and we headed off on our little adventure. During which we discovered that the GPS on my phone was broken and the directions I'd printed were worthless. Fortunately the GPS came back to life in time to get us most of the way through Kansas City and we'd been to the store about a year a go, so our memory got us the rest of the way.

While I really wanted to make EXACTLY the store sample, I knew that would be next to impossible and well... I'm not much good at following instructions anyway, so I figured I'd just go with the flow. So for the next 4 hours we added layer after layer of gesso, paper, and colorants in a multitude of forms - paints, spray inks, markers, baby wipes (yes, I said baby wipes!) and more. At the end of class my hands were nearly as much of a work of art as my canvas (and I looked like a member of The Blue Band for nearly a week following). Dyan warned us not to use the letters and numbers because we'd try to make them too perfect, so of course the little rebel in me went straight for those (plus, by the time I got to the stencils they were really the only ones left, ha!). Dyan came by a few times to review my use of said stencils and since I wasn't scolded, nor did she take them away, I'm assuming I must have been doing them justice :)

And at the end of four hours of furious creative activity, this little "masterpiece" was born. Quite simple to make really -once Dyan had deconstructed it. Now I just have one decision left to make... to frame it not? That's the question!

Abstract Canvas by Mollie Deem.
Class and technique instruction from Dyan Reaveley.
 
 And here's the fabulously, no diliriously happy canvas that Linda made. How can you not just look at this and smile?
Abstract Canvas by Linda Franklin
(Sorry, not the best photo/photo editing job ever.) 
 
 
Just to give you a little taste of the variety that can be generated by the same techniques, here are pictures of canvases made by some of our classmates:
 

Thursday, September 27, 2012

Classic, vintage style

Do you ever buy supplies that you just love, but you can't use them because then they wouldn't be safely tucked away in your stash? I'm totally like that with my Jenni Bowlin products. Partly because I don't want to use them until I have that perfect picture to make good use of them, but also because my LSS doesn't tend to carry her stuff and much of it I've purchased at stores far, far away or online. I totally love how timeless her products are. They're like that classic Ralph Lauren sweater in your closet that never goes out of style.

Well, I've decided that I'm on a mission. I'm going to USE (gasp! yes, I said the "U" word!) my supplies. No more hanging out safely tucked away in their pristine packages. These babies are going on my pages to be beautifully displayed and (safely) tucked away in my albums!

So I sorted through my supplies and pulled out all of my Jenni Bowlin stuff into a pile and just started creating....

Here I used some newer product, the triangle banner stickers and chipboards long with the Blue Ribbon punch to fashion this cute little banner.


And here I used everything I can get my hands on: Some product packaging and some older product along with the new hexagon stickers. Aren't those vintage buttons super cute?


And here's what it looks like all put together - a lovely mix of the old and the new, blended together to create a timeless layout.


Tuesday, August 14, 2012

Creating Keepsakes Sept/Oct Issue is on Newsstands Today!


The September/October issue of Creating Keepsakes is officially on newsstands today and I'm excited to be included in this issue!


I have a layout in the "Monster Mash" feature article on page 70. It's a variation on one of my all time favorite layouts. (It actually hangs framed in my scraproom...yeah, I like the original version that much!) Would you believe that this was my first foray into using spray mists and paint spatters? ...Anyway, the article is jam-packed with lots of different techniques to try on your next layout. And here's my free tip for you: go to your local hardware store and stock up on those super cheap, thick bristled brushes. They make the best applicator for grungy paint techniques. :)

So head on over to wherever you buy your Creating Keepsakes and pick up an issue! (For you local folks, I spied a few issues at Memory Bound!) And if you don't have a local store, you can buy it online at the Creating Keepsakes store. Go! Get Inspired! :)